In this post, we will see how we can configure RIP and OSPF in JUNOS.
We will use the same topology with two directly connected Juniper routers. I have removed the static routes we configured in the last post from both R1 and R2. At the moment we have routers connected with 10.1.12.0/24 subnet. R1 and R2 has a lo0 interface with IP 1.1.1.1/32 and 2.2.2.2/32 respectively.
Our goal is to run RIP between the routers and establish reachability between loopback interfaces.
To enable RIP, we have to configure a group and assign interfaces to it.

Here I have used the group "TEST" and assign both ethernet and loopback interface to it. The same is configured on R2.
Now, let's check the routing table of R1 and see if we receive any RIP routes.

We can see that R1 learns multicast address 224.0.0.9/32 via RIP but we don't see any other RIP routes!! This is the default behaviour in JUNOS where it will not send any routes via RIP unless we specify a policy.
We must create a policy to export the routes. These commands will be applied on the routers.
set policy-options policy-statement RIP_Routes from protocol rip
set policy-options policy-statement RIP_Routes from protocol direct
set policy-options policy-statement RIP_Routes then accept
Here we have created a policy called "RIP_Routes". The first statement matches the routes learned via RIP (from a neighbor). The second statement matches the direct networks (equivalent to "connected" in Cisco IOS). Finally the third statement says that these updates will be passed.
This is how it looks like in the config
 Now, we will apply this policy to the group "TEST".

The similar config has been applied on R2 as well so let's check the routing table of R1.

We can see that R1 learned the prefix 2.2.2.2/32 via RIP from 10.1.12.2. The "preference" (Admin Distance) for RIP is 100 in JUNOS.

We can ping 2.2.2.2 from R1's lo0 (1.1.1.1).
More information on configuring RIP can be found here http://www.juniper.net/documentation/en_US/junos14.1/topics/topic-map/rip-basic.html
Ok, Now let's see how we can configure OSPF in JUNOS. I have removed the previous RIP configs from both the routers by applying these commands
delete protocols rip group TEST
delete protocols rip group TEST export RIP_ROUTES
delete policy-options policy-statement RIP_ROUTES
On both the routers, we will assign the interfaces in area 0 of the OSPF process.

We can now see that the ospf neighbourship is up between the routers.

The neighbourship is in "Full" state. The remote routers interface IP is 10.1.12.2 and the router ID is 2.2.2.2.
Let's check the routing table

So R1 has learned the multicast address 224.0.0.5/32 and lo0 of R2 (2.2.2.2/32) via OSPF. Juniper always shows multicast address associated with the routing protocol. The OSPF preference is 10 in Junos.
Here is the output of OSPF database

We can see LSA type 1 (Router) and type 2(Network) as all the interfaces are in the single OSPF area.
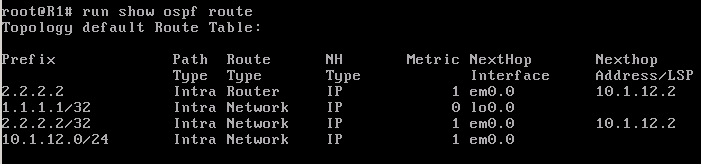
The above output shows that all the ospf routes are Intra area routes.
What if we assign the lo0 of R2 in ospf area 1.

Now let's check on R1 again


We can see that the type of the prefix 2.2.2.2/32 is now "Inter" which implies that it's an inter-area route. In the OSPF database, we can see the type 3 summary LSA generated for 2.2.2.2.
If you are familiar with Cisco IOS and wants to learn JUNOS. I would strongly recommend going through free WBT at https://learningportal.juniper.net/juniper/user_activity_info.aspx?id=3310
We will use the same topology with two directly connected Juniper routers. I have removed the static routes we configured in the last post from both R1 and R2. At the moment we have routers connected with 10.1.12.0/24 subnet. R1 and R2 has a lo0 interface with IP 1.1.1.1/32 and 2.2.2.2/32 respectively.
Our goal is to run RIP between the routers and establish reachability between loopback interfaces.
To enable RIP, we have to configure a group and assign interfaces to it.
Here I have used the group "TEST" and assign both ethernet and loopback interface to it. The same is configured on R2.
Now, let's check the routing table of R1 and see if we receive any RIP routes.
We can see that R1 learns multicast address 224.0.0.9/32 via RIP but we don't see any other RIP routes!! This is the default behaviour in JUNOS where it will not send any routes via RIP unless we specify a policy.
We must create a policy to export the routes. These commands will be applied on the routers.
set policy-options policy-statement RIP_Routes from protocol rip
set policy-options policy-statement RIP_Routes from protocol direct
set policy-options policy-statement RIP_Routes then accept
Here we have created a policy called "RIP_Routes". The first statement matches the routes learned via RIP (from a neighbor). The second statement matches the direct networks (equivalent to "connected" in Cisco IOS). Finally the third statement says that these updates will be passed.
This is how it looks like in the config
The similar config has been applied on R2 as well so let's check the routing table of R1.
We can see that R1 learned the prefix 2.2.2.2/32 via RIP from 10.1.12.2. The "preference" (Admin Distance) for RIP is 100 in JUNOS.
We can ping 2.2.2.2 from R1's lo0 (1.1.1.1).
More information on configuring RIP can be found here http://www.juniper.net/documentation/en_US/junos14.1/topics/topic-map/rip-basic.html
Ok, Now let's see how we can configure OSPF in JUNOS. I have removed the previous RIP configs from both the routers by applying these commands
delete protocols rip group TEST
delete protocols rip group TEST export RIP_ROUTES
delete policy-options policy-statement RIP_ROUTES
On both the routers, we will assign the interfaces in area 0 of the OSPF process.
We can now see that the ospf neighbourship is up between the routers.
The neighbourship is in "Full" state. The remote routers interface IP is 10.1.12.2 and the router ID is 2.2.2.2.
Let's check the routing table
So R1 has learned the multicast address 224.0.0.5/32 and lo0 of R2 (2.2.2.2/32) via OSPF. Juniper always shows multicast address associated with the routing protocol. The OSPF preference is 10 in Junos.
Here is the output of OSPF database
We can see LSA type 1 (Router) and type 2(Network) as all the interfaces are in the single OSPF area.
The above output shows that all the ospf routes are Intra area routes.
What if we assign the lo0 of R2 in ospf area 1.
Now let's check on R1 again
We can see that the type of the prefix 2.2.2.2/32 is now "Inter" which implies that it's an inter-area route. In the OSPF database, we can see the type 3 summary LSA generated for 2.2.2.2.
If you are familiar with Cisco IOS and wants to learn JUNOS. I would strongly recommend going through free WBT at https://learningportal.juniper.net/juniper/user_activity_info.aspx?id=3310
No comments:
Post a Comment